
Wednesday, February 3, 2010
Tuesday, February 2, 2010
Love Rocks! Valentine

I used some of the Love Letters DP I had bought at Beverly's. I combined it with Purely Pomegranate, Rose Red and textured Basic Black card stock. The Stamps are Rough Edges Alphabet, Whimsical Alphabet and Angelic.
Monday, February 1, 2010
Romantic Love Valentine Card
 I went to Beverly's, our craft store near us, and bought a bunch of different craft supplies on sale. The scroll stamp is from Stampendous-"Mini Corners" and I bought it for .25 cents!! The card stock I used on this card was Bravo Burgandy, Rose Red and Old Olive. While shopping I picked up some new Valentine DP made by Little Yellow Bicycles. It is from the Love Letters collection.
Wednesday, January 27, 2010
Best of Cluck Recipe Card/Book

I made this card/book for one of my very dear friends. She is leaving to go back to Japan in a couple of months. Her family is getting stationed there for 2-3 years. I LOVE to cook and every time she and her family come for a visit I make her a lot of yummy things! She has asked me for the recipes that I have made for her but I always get distracted and it never happens. So, I thought it would be special if she had all of the recipes from her visits in a little book. The inside holds six recipes. I will take more pictures of the inside pages when they are filled. The stamps I used were: Best of Cluck, Only Ovals and What's for Dinner. I used Basic Grey DP, Always Artichoke, Ruby Red and Glossy White card stock.

Tuesday, January 26, 2010
Asian Inspiration Card...
 I'm on an Asian Card kick! I love anything Asian! I've been wanting to use my Jolee Kimono set for some time now. Today I saw it sitting there and came up with this design. I had used my Infuse Basic Grey DP yesterday and saw the page of die cut flowers that came with it. It looked like it could be cut to resemble hair. So, what you see on my little kimono girl is one of the Infuse die cut flowers cut and placed on a circle punched circle face. I water colored a piece of watercolor paper and punched her face out of it. I stamped the cherry blossom stamp from Art of the Orient stamp set in Close to Cocoa and used my Stamp-a-majig to place them. Then I placed the Jolee's cherry blossom branch with the extra cherry blossoms over the stamped images. From the Kanji set, I used the Love Kanji symbol and left off the "love" and stamped it in Cameo Coral. The Japanese stamp that is stamped on top, in Night of Navy, is my own personal Japanese name stamp. With my blender pen I added a little Only Orange and blended the images together. My paper colors are Night of Navy, Bordering Blue, Cameo Coral and Glossy White card stock. The square of Cameo Coral, I rubbed the edges on my gold stamp pad then embossed it in gold EP. The Night of Navy background piece, I versa Marked the Chinese symbol in Art of the Orient stamp set all over and embossed it in clear EP. The center of my flowers is Diamond Stickles and I also added it to the headpiece and her fan. I had mini beads that were the right colors so I added them to the head piece and fan, also. Thanks for looking!
Monday, January 25, 2010
Wonderful Wings Thank You Card
 I still have some left over Yen, that has been laying around, from when we lived in Japan. I used a 1 Yen piece for the center of my card. It matched the center of my dragon fly I made with my SU Pretties kit and some silver leaf charms for his antennae. I used wire cutters to make the hat pin smaller, added my beads and crystal effect to secure the end cap. The paper I chose to make this card was my Basic Grey Infuse collection. A few of the papers looked somewhat Asian to me. The circles on the center paper looked like Japanese paper parasols. I popped the white pattern paper and the center flower up. Short & Sweet Thank you stamp was used on the chip board tag. The Dragon fly was cut from green embossed pattern paper. While living in Japan, my dear Japanese friends had a personalized stamp made for me. I was able to use it on the circle background piece. I LOVE my stamp and cherish it!!
Friday, January 22, 2010
Sublime All Aboard Card
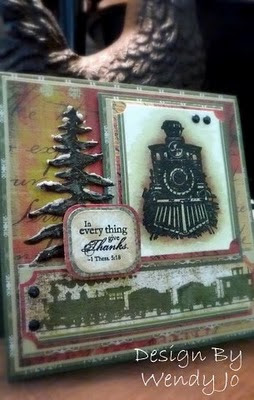 It was the first stamp set I saw, going into my stamping room, so I decided to use it. Right away it made me think of the many trips we took to Cass Scenic Railroad in WV. when I was a little girl with my family. I love that place! I was wondering what I would do with my Basic Grey Sublime DP that I had sitting around. I picked up my stamp set and then started going through all my DP. The Sublime paper just had all the colors I was used to seeing in the leaves when we took that train up the mountain. The beautiful cursive handwriting all over the paper made it look old. I used watercolor paper and Versa Marked my train image and embossed it in black. I started out using my grey chalks and then used my re-inkers to watercolor around the image. I used Creamy Caramel and River Rock. I had these metal trees I've been wanting to use on a card. I scratched them with an Exact-o knife to look like pine needles and added some applique for snow. I then went back in and colored them with Always Artichoke and black markers. I covered it with Crystal Effects. I was impatient and used my heat gun to hurry up the drying process of the crystal effects. It started to bubble a bit and shrink up but left a really nice texture on the tree. I also scratched the brads to match the tree. Here is a link to one of my favorite places in the world...
Thursday, January 21, 2010
Party Hearty Card
 For the month of February, I have three Birthdays I need to make cards for. This card was pretty fast! Not much stamping, just embossing. With the rub-ons I had used it was even faster. I liked the contrast of the Black up against the Apricot Appeal cardstock. I mixed in Cameo Coral, Glossy white, and Stampin'up! pattern papers.
Wednesday, January 20, 2010
Serene Sunflower Just Because
 I had a very busy day today, taking kids to the doctors, being my sons bus driver, and trying to clean my house in between it all. So, not much time to stamp today. It had been a long time since I had made a Love Note sized card. This card measures 3 x 3 inches. I was in the mood to make a card with bees and this color combination. I used the rub-ons from Stampin'Up!. The card stock is So Saffron, Glossy white and Basic Black.
Tuesday, January 19, 2010
My Pretty Peony
 It has been raining here for a couple of days now and the weather man says it is going to last till the end of the week. All this rain started me thinking of my flowers in my front yard. We hardly ever get rain here so, I can't complain. Actually, it was very cozy just being rained in all day in my house. I know the rain is going to help my flowers bloom beautifully when Spring comes around. Can't wait! Today I used my Pretty Peony stamp set and matched it with my Basic Grey Stella Ruby pattern papers. I cut the blue flower right out of my BG paper and used crystal effects over it. I glued some small green beads to the center and sprinkled iridescent ice EP over the top. The blue background paper has been cuttle bugged, sewn and embossed with iridescent ice EP. I stamped the small outlined peony on pattern paper in ruby red and then used a Stampamajig to place the versamarked peony stamp over the outline and clear embossed it. The wire is very thin black wire that I wrapped around the end of a paint brush and slid off. I had a sticky chip board vine that I covered in DP. Of coarse I had to add a little sparkle with my Diamond Stickles to finish it off.
Monday, January 18, 2010
Doodle This Girl Power!

Right now the Hottest color trend in young girls fashion is the Black, White and Hot Pink Combination. Everywhere you look you see it mixed with peace signs or cartooned skulls. I was out shopping for my little girl and got inspired to make this card. I used the Doodle This stamp set along with my Girl Power set. For the background paper, I started out with a square of Textured Grey SU card stock that measured 5 1/8" x 5 1/8". I Embossed it first all over with the Pearl EP using the Doodle This swirl and again with the White EP. I placed a 5 1/8 x 5 1/8" square of paper vellum over my finished background square. I set my eyelets. Next, I cut my peace sign out of my Spellbound Black glitter pattern paper, embossing it with a small heart stamp in White EP, randomly all over. I added small silver stars with a glue pen, setting it on the background paper with dimensionals. I then punched all of my flowers out and Diamond Stickled some. I stacked them with mini glue dots, placing them on the peace sign. The Girl Power tag was made up of a silver metal tag, small pieces of card stock, Scraps of ribbon and a paper fastener to keep the ribbons secure. Here is a picture of my inspiration! 
Friday, January 15, 2010
The Cat's Meow Valentine Card

This Valentine card is for all the Kitty Lover's out there. As I started making the card I was thinking about what kitty's like, what they do and what they wear. Cat's like to play with yarn. I had some really cute yarn with tiny sequins sewn into it. I had a sticky letter "V" that I pushed into green mini beads that matched the card stock. I covered it in crystal effects to make sure all those little beads stayed put. It reminded me of the rug covered scratching posts. I had a mini jingle bell on very thin black wire I added to make his collar. In the picture the "V" and the card stock look like two different colors but they are the same. My camera just didn't want to cooperate with me today. My card stock colors I used are Real Red, Glossy White, Certainly Celery, Basic Black and red and white striped and green pattern papers. While in Japan I loved shopping at the Daiso (Dollar store). They always had the best accesories for making my cards. I found the little stars I used on this card in the manicure section of Daiso. They had tons of tiny fingernail decorations that were just the right size and ALWAYS the right price to add to my homemade cards. Toshiko, I couldn't help but think of you, Kyoko, you're beautiful cat and Japan :)
Thursday, January 14, 2010
Quilted Angelic Valentine
 Friendship is...
the sort of Love
one can imagine
between Angels
I was in a Romantic kind of mood today. I wanted to do a Valentine card that was country and romantic with soft colors. So, I started thinking of quilts, roses and light pinks and greens. My Angelic set came to mind for the main art. I had a sheet of pattern paper that looked like a plain quilt with stitches. I used it for my background and cut a lot of little one inch squares of different pattern papers and glued them on, making sure you could still see the stitches in between. I pulled colors from my papers and colored my angels to match using my reinkers and a water color brush. I covered the angels in Cryslal effects and let it dry. Then I put Diamond Stickles on their wings. The Heart hardware just happened to fit right over the square metal frame. the holes matched up perfectly. My card measures 5 1/4" x 5 1/4".
Wednesday, January 13, 2010
Friends Always Valentine Card
 You are my Friend...Always
 Valentine's Day is right around the corner! I thought I should start working on some Valentine cards. :) I was playing around with my Always stamp set, which I absolutely love, and I came up with this Design. I was able to finally use my Only Ovals. It combined well with the Always. It is hard to see in the picture but I popped up some of the flowers on the heart and on the bird. I used Diamond Stickles on both images, also. The ribbon is actually Always Artichoke color but the photo made it look different. I added brushed silver brads to the corners and a cute flower charm with silver cording in the center of the bow. No embossing this time! Just stamped images and lots of Stickles. The colors are Ruby Red, Always Artichoke, Naturals Ivory, textured Sand card stock and Basic Grey and Stampin'Up! pattern papers. The card measures 5 1/4" x 5 1/4".
Tuesday, January 12, 2010
Baroque Sweet Things

I saw these colors used for a card in an old Stampin' Up! catalog and loved the way it looked together. I happened to have the Basic Grey brown/blue circle paper on hand. The circles matched exactly to the card stock I used. The colors for this card are Soft Sky, Chocolate Chip, Certainly Celery and Glossy White cardstock. I Glassy Glazed the Baroque Motifs stamp on the Soft Sky background along with the Cherish stamp. The Large flowers were made of punched flowers from cardstock and chip board flowers from Basic Grey. I just stacked them on top of eachother. I used silver brads in the centers to attach them together. I punched the hole in the center of the card with the circle scallop punch. The "Love You" stamp from Sweet Thing was stamped on Glossy White cardstock in Chocolate Chip and rubbed with Soft Sky and Certainly Celery inks.
Monday, January 11, 2010
Godspeed Retirement
 I have a friend who's husband has retired from the Marine Corps. We are next! Two more years for us and we will be back on the east coast somewhere. I made this card with Basic Grey pattern papers, True Thyme, Bashful Blue, Chocolate Chip and River Rock card stock. I water colored the Godspeed image, aged the edges and glassy glazed over it. My glassy glaze had been mixed with a little white EP by accident when I was in Japan so, it comes out speckled with white flecks. I had forgotten about that and used it. As I was heating the glassy glaze I saw the white flecks starting to show and got worried. It actually looked pretty cool on this card. I really liked the effect. The card is 5 1/4" x 5 1/4". The brad I used had a square center so I cut a piece of Bashful Blue card stock and glued it in the middle then used crystal effect over it. It is a "GUY" card so I TRIED to keep it masculine and somewhat simple. :)
Friday, January 8, 2010

Thursday, January 7, 2010
Heartfelt Thanks
 Today I had a small break from little Leila while she was napping. I was able to make four of these "Heartfelt Thanks" Thank you cards. The thought I had for making these was for my friend Sarah. She had put my name down on a referral for housing and they are sending me a check for $250.00! It was so nice of her to think of me! It is the same papers I had used for my Mom & Dad's Anniversary card. I love that with a good design and a few changes you can have a completely different card! The stamps used on this card were Baroque Motifs, Heartfelt Thanks and Word on Word. The card's dimensions are 5 1/4" x 5 1/4".
Wednesday, January 6, 2010

Tuesday, January 5, 2010
 I made these little Apron Recipe Gift Books for my daughter's "Cookin' Birthday Party." In each book there are five pockets. I put in the first pocket a friendship poem that I printed out from my computer on White card stock and adhered it to Real Red card stock from Stampin' Up!. The next four pockets had stamped recipe cards (What's for Dinner Stamp Set) with our recipes, we used at the party, written out on each card on alternating red and green card stock. The girls had made Sparkling Punch, Santa Sacks, Christmas Mice & . During the party I had taken a lot of pictures with Tiffy and the girls. With each girl I took one picture of just Tiffany and that girl. I had daddy print them out a little smaller than the size of the recipe cards. So, each book had a picture with Tiffy and the girl on the back of the friendship card and pics of the party on the rest of the backs of the recipe cards. We adhered them to the backs of the five cards. I also had slipped lollipops in the first pockets of each book. The girls took them home with them after the party was over along with white cotton chef hats filled with candy and tied with a matching ribbon.
Apron Recipe Gift Books
 I started out with 4x6 pieces of thin cardboard. The top of the Apron is 2 inches wide and the side of the Apron measures 2 3/4 inches. The pattern paper is made by Basic Grey. I glued the pattern paper onto the cardboard and cut it out as close to the edge as I could then sanded the edges and edged it with a gold Painty pen. I did the same to the back piece of the book, also. Next, I punched out the holes for the spiral wire on the front and back pieces of the book. The Real Red card stock on the front (3 3/8 x 2 1/4) has been scalloped at the bottom and cuttle bugged with the Snowflake plate. I used the "Backyard BBQ" stamp set for the front of the apron. The Green paper measures 2 x 2 and the white "What's Cookin'" paper is 1 7/8" x 1 7/8". I stamped the "What's Cookin" image onto the white paper and rubbed the edges of the White paper with green ink. The five pages/pockets in the book are very simple, they are 2 3/4" x 8" pieces of card stock folded in half lengthwise to measure 2 3/4" x 4". 1" x 4" strips of coordinating paper are placed on top of the pocket at the bottoms edge and stapled across the bottom three times. At this point you punch the holes out for the spiral wire. Repeat for next four pocket pieces. When all of the pockets are finished and the front and back pieces are done you align the holes up with each other and with needle nose pliers spiral your wire through the holes and bend the ends of the wire in. To make the recipe cards, cut 5 pieces 7" x 3 1/8" rectangles of card stock, 3 red and 2 green. Stamp 4 recipe cards on white paper with the "What's for Dinner" stamp set and cut out and adhere to the 7" x 3 1/8" pieces of card stock. I printed out the Friendship recipe card with a border. It says:
Friendship Recipe
Mix kind words and a smile,
A little Pinch of niceness,
Then stir it up awhile.
Now put it in the oven,
And make it nice and warm.
The way you know a Friendship
Should always grow and form.
Finishing touches: With the Snow Blossom punch, punch out three in green cardstock and with a small snowflake punch, punch out three in white card stock. I used mini pop dots to attach them together and to the card. I used stickles in the center of the snowflakes. You could leave it just like that or you can punch two holes at the top of the fronts and backs of the aprons and add large eyelets with 2- 6 1/2" pieces of ribbon to make the handles.

Monday, January 4, 2010
My Christmas Cards for 2009
 I had received a Christmas card from my friend Megumi living in Japan and loved her layout! I used her Gate-card style and made my cards with Real Red, Bashful Blue and Brocade Blue card stock.
Sunday, January 3, 2010
My Mom & Dad's Anniversary Card
 I had bought these little paper Japanese kimonos while stationed in Japan. I intended on making this card last year for my parents Anniversary but, just got to it now. Their Anniversary was yesterday, January 5th. They have been married for 53 years!!! Wow! Thank You Mom & Dad for Blessing "US" with 53 years of marriage and being the BEST example that anyone could have had! God has made you into the evidence that you want to teach us!
 The card details: The wooden Japanese heads were bought separately to go with the kimonos. I matched up my papers with the colors of the kimonos. The background behind the people was a scrap I had made previously with the Ink & Smash technique. Always keep your scrap papers! I had been playing around with the technique, trying out different colors, and it didn't work for that project but really worked well for this one! I have a Torii stamp I stamped in Versa Mark and stamped it on the Ink & Smash glossy paper and used Glassy Glaze over it. While still "wet" from the heat gun I sprinkled diamond dust over the top. The main flower patterned paper is Stampin'Up!'s Ginger Blossom and the circle paper is from Basic Grey. The circle paper was stamped with Art of the Orient-Kanji stamp in Brocade Blue ink. The card's dimensions are 51/4" x 51/4" and made with textured grey SU paper as the main top fold card. I used Bordering Blue and Ruby Red as the other layer colors. To "age" the patterned papers I rubbed chocolate chip and Brocade Blue on the edges. I used the Ginger Blossom patterned paper to make the paper beads and covered them with Crystal effects. I added a copper brad and tied a bow with the silver cording holding the paper beads. The Cherry Blossom punch was given to me as a gift and was bought in Japan. I punched nine flowers out of the Ink & Smash paper I had used to make the card face and added diamond stickles to the centers.

Subscribe to:
Posts (Atom)