

Menu:
Bread
Parker House Herb Loaves
Soup
Corn & Crab Bisque
Entree
Garlic Prime Rib
Sides
Country Bacon & Carrots
Potato Shiitake Gratin
Dessert
Christmas Lava Cakes
Beverages
Old Virginia Orange Wassail
Eggnog


 Menu:
Menu:

 Directions on making bows:


Supplies:


 Donna, Uriah and Grace came to stay with us for five days before Thanksgiving! We were all so excited to visit with them. I couldn't wait to see my friend and just sit and talk and have coffee together! The boys had a great time with Uriah and Tiffany with Grace. We are all looking forward to their return in December. These are some of the pictures I had taken at Asilomar beach while they were here. When the water was at low tide it left all the rocks exposed. On the rocks lived all sorts of diiferent sea creatures like the beautiful pink star fish above.
  The Aggragating anemones were the most fun for the kids! They were even brave enough to touch them. I thought it would sting us but it didn't. The top picture is when they are out of the water and the bottom picture is when they are under the water.

 Thousands of muscles clustered on rocks.
 Friends:o)
 Austin
 Grace
Grace The sunset while we were there at Asilomar beach
 We had found this great little Japanese Sushi Restaurant called "Jugem." They had traditional and speciality sushi and sashimi! We were surprised to see they sold tempura, yakiniku and udon also. The boys have been missing their udon! I ordered the rainbow sushi and Donna had the salmon sushi. YUM!
 We were invited to go to the Kono Elementary School Festival on the 18Th of November, by my friend Eiko-San. Elsa and Lilly also went with their families. Eiko had told me that they had 8 Kimonos for the American women to try on. I couldn't wait, I hadn't tried one on in the whole two and a half years I have been living here. They let us wear them the whole time we were there. They chose a very beautiful light green Kimono for me. Even Shelby got to dress up! There are a lot of layers to the Kimono and it is very involved to put on. The Japanese ladies that dressed us were very experienced and fast and knew which ones would look best on us. They chose the perfect colors for each one of us. The Obi (sash) they wrap round your waist is my favorite part of the kimono. They can tie it to make many different designs like bows or drums.
The video is just a small part of the play the kids put on. They practice for this festival all year. Their costumes were very beautiful. I wish I had video taped the entire play! They were wonderful!!! After the play they had food for sale (udon noodle, rice ball, soda, coffee), crafts, and plants. To see more pictures of that day look at the side bar of my blog.


 My card is a 5 3/8x5 3/8 square. The dimensions, starting with the background paper, are5 1/4x4 1/4 cranberry crisp and 4x5 Fruitcake Holly berries. Moving clockwise, the tree box dimensions are: 2 3/4x3 3/4 Old Olive, 2 5/8x3 5/8 Fruitcake cherry and 2 1/2x3 1/2 fruitcake Holly Berries. The flowery box: 4x2 1/4 Old Olive, 3 7/8x 2 1/8 cranberry crisp, 3 3/4x 2 Fruitcake Tidings. The plaid box: 2 3/8x3 cranberry crisp and 2 1/4x 2 7/8 Fruitcake plaid.
 Our second "Crazy for Christmas" card class was today. I found this ribbon at our PX and wanted so badly to use it on our cards. It is made by Hallmark. I used the perfect presentation "North Pole December 25Th" circle stamp. The Sweet Holidays stamp set was our main stamp set that we used. I have never used the gingerbread house before. We colored it and Versa marked it, then poured iridescent ice all over the image. We heat embossed it then added the liquid applique and heated that up, also. It is so cute and fun to decorate! Also, the candy cane came from the Holiday Tag Team set. The box that we made was just a 2x4x6x8 box. I cut a large 12x12 Whisper White paper into 81/2 x 12. Then I cut that into 71/2x 81/2 and kept the left over for the top of the box. I made them 51/2 inches tall.
 We had our "Crazy for Christmas Cards" class today! I wanted to have them make a Christmas card and a matching Christmas box. Both the box and card have pieces of fresh Cyprus on them. I love to use natural elements in my cards. It smells so good when you take the cards out of the envelopes! We used liquid applique right on the branch as to look like snow. The snowman came from the "Thanks snow much" retired set. I believe that was my first stamp set ever! I love the color combination with this card. I used Purely pomegranate, Old olive, Whisper white and River rock. Also, Dashing Christmas paper.

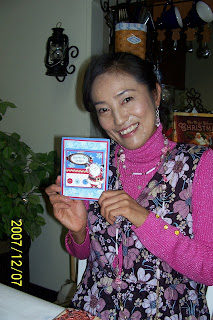
 Hiroko is concentrating :o)
 My Beautiful friends! Thank you so much for all the food for our lunch today! It was so good! I especially loved the Chinese meatfilled buns. YUM!


 Everyone looked so good in their costumes! The adults wore costumes as well as the kids. We had lots of little witches at our party. Kumie borrowed a witches hat and she was a pink and black witch, Migumi was a pirate like me! Elsa was Cruella Deville, Lilly wore a feathered mask, Eiko was a blonde she devil, Toshiko borrowed a green wig and looked soooo cute, and Kyoko was a cute little witch, too. Kyoko went off with Shelby to go trick or treating with the teenagers in the neighborhood. I am glad they got to spend some time with each other. Tomoko and Toshe were beautiful witches, also! Takumi was the handsomest Shrek and Diana was a very cute baseball player!
  We had around 40 people combined with Regina's group. The picture only shows some of our group. We headed out for Trick or Treating and came back to have smores in the fireplace. Everyone was having so much fun which made me very happy! Some of the adults had never dressed up before so they were able to experience something NEW, which is always exciting! Happy Halloween memories everyone!