Thursday, January 31, 2008
Next Class- Eiko's Card Class!
Sunday, January 27, 2008
Keep'n Warm in Japan! Kiriko's Card Class


I was creating two cards for my class tomorrow and was just thinking about how nice the weather has been lately. I couldn't stop thinking of spring. I had just taught a valentine class and was wondering what my next theme should be. I couldn't wait till spring so I can use all of my butterfly and flower stamp sets again but felt it was a little to early for that yet. It was really hard for me to not reach for them but I had just bought cold play and wanted to use it. I figured it is still January even though it hasn't felt like it, so cold play would be a good stamp set to use. I pulled it out and started to play around with it and noticed that it had a stamp in there that said "let it snow!" The song was stuck in my head the entire time I was creating the card. I happened to look up and glance out my window and it was SNOWING like crazy! We haven't had snow like that in a long time. It was beautiful! God must of heard me when I was singing "Let it snow, Let it snow, Let it snow!" My children were able to run outside after school and make "two" snowmen as I was making mine inside my house! Cold play was the perfect stamp set to use for today.

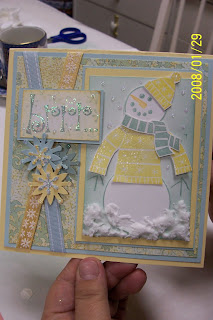
Kumiko's beautiful card!

Even Yuu Chan got into the stamping with us. She made her own little stamped book!
 Yoshie was hard at work even though you can't see her cards. Great job!!
Wednesday, January 23, 2008
Lilly's "South of France" Cooking Class!


Tuesday, January 22, 2008
ABC Class! Valentine Photo Wallet

 Today we had our ABC Class. We made a "Photo Wallet" for Valentine's Day. There were a lot of details in this little booklet so it took some time to get it all done. With mine, I had printed out black and white photos of our four children and placed them in the center pages. Since there were only three center pages I put the girls together.
The stamp sets that were used for this project are: Mon Ami, It's a Girl Thing, Warm Words, Sweet Thing, Festive Four, I like your Style, So many Sayings, Time Well Spent and a Michael's Kiss stamp. Real Red, Bashful Blue, Whisper White, and Pretty in Pink card stock. Retired Stampin' Up! pattern paper. Real Red, Bashful Blue, Whisper White stamp pads. Sponge Daubers, Pewter hardware, Rhinestone Brads, Glassy Glaze, Silver EP, Ribbon, Dimensionals, Stapler, heart nail charms, corner rounder, Prima petals, flower punch.
Directions:
Paper Cutter
Scissors
Corner Rounder
Stamps
Ribbon
Ink
Sticky Strip™ adhesive
Bone Folder
One 4 ¼” X 12” piece of card stock for Wallet (Real Red) Scored at 3 1/4",
6 1/2", 10 1/8" and 10 3/8" and corners rounded.
Three 3” X 8” pieces of card stock for the Photo/Journal Covers Scored at 4" (Bashful Blue & Pretty in Pink) and corners rounded.
Three 3 3/4" X 2 3/4 " Real Red Journaling Inserts, corners rounded
Two 3 3/4" X 2 3/4" Pretty in pink Photo Layer, corner rounded
One 3 3/4" X 2 3/4" Pattern Paper Photo Layer, corners rounded
dimensions of smaller pieces below
Page one:
 Stamp your 3 3/4" X 2 3/4" Real Red piece with heart stamp from the I like your style stamp set in Whisper White ink. Stamp your 2 X2 1/2" Pretty in Pink piece with the same heart stamp in Whisper White also. Rub edges of your Whisper White 2 1/4" X 1 3/4" piece in Real Red ink. Sponge around edges with Bashful Blue. Stamp "Kiss" in Real Red and sprinkle Glassy Glaze over kiss. I embossed Kiss three times with the glaze. On Scrap piece of Whisper White stamp affection stamp from Mon Ami in Real Red. Cut heart out and rub edges in real red. Stamp "So many sayings" stamp in Real Red. Cut out the "Be mine hugs and kisses" part and glue to the back of pewter hardware. Layer and tape all of your finished pieces as shown. Cut your ribbon and fold tuck under the left side of the hardware lay hardware on the Piece and use your punch and punch your holes for the brads. Put your brads in and tape the finished piece to the wallet. Add your affection heart with dimensionals and your are done with page one!
Page Two:

Stamp your 2 3/4" X 3 3/4" Pretty in Pink piece with the "X" and "O" from the small alphabet set in Whisper White. Wrap Real Red ribbon around the piece and tape on the back. Adhere your Real Red 2 1/2" X 2 1/2" piece to the pretty in Pink. With your 2 3/8" X 2 3/8" Whisper White, Stamp Cherish stamp from the Warm Words set in Real Red. Adhere. Adhere a 2 1/4" X 1 3/4" Black and White photo to your Whisper White. Use a pop dot to affix your bow and add a bubble word. Adhere finished Photo piece to the wallet and your done with page 2!
Page Three:

Rub the edges of your 2 3/4" X 3 3/4" Pattern Paper with a sponge dipped in Real Red. Stamp Sweet! on the bottom left corner of your 3 3/8" X 2 3/8" Real Red piece from the stamp set Mini messages. Adhere your 1 7/8" X 2 1/4" photo to the right side of your Real Red Piece.The top heart is done by using glossy paper. I dropped Bashful Blue drops of ink on the glossy paper and placed a clear sheet of acrylic over the ink. Pull the plastic sheet off and let it dry. Stamp the Mon Ami stamp in versa mark and stamp on your dry finished glossy paper. Emboss with Silver EP.Cut out. Stamp the affection heart in silver ink and stamp image onto Bashful Blue card stock. Cut out. Rub edges into bashful Blue ink. Adhere the affection heart then use dimensionals to add glossy heart. Punch lower right corner with 1/16" punch and add Rhinestone brad. Adhere finished photo piece to Wallet and your done with page 3!
Page Four:

Stamp your 3 1/4" X 2 1/4" Whisper White with the It's a girl Thing stamp in Real Red. Rub edges in the Real Red ink. Adhere your 3 1/2" X 2 1/2" pattern paper to the stamped Whisper White piece. Place a Prima flower that has been colored with a real red marker and dried in the middle of the piece. With a flower punch, punch out a flower in Whisper White. Place on top of the Prima. Using a 1/16" punch, punch a hole through the papers and flowers. Add your Rhinestone brad. Adhere finished piece to the photo wallet and your done with page 4!
Page Five:

Stamp your 2 3/4" X 3 3/4" Real Red piece with "Time well spent" heart from that stamp set in Whisper White ink. Stamp your 2 1/4" X 2 1/2" Pretty in Pink piece with the heart stamp from I like your Style stamp set in Real Red ink. Wrap your ribbon around the piece and tape in the back. On a scrap piece of Whisper White stamp the valentine envelope from Festive Four stamp set in Real Red ink. Cut out. Stamp the Amour heart from Mon Ami stamp set in Real Red ink on a scrap piece of Whisper White. Cut out. Stamp the heart from Time Well Spent on Bashful Blue card stock and then stamp Love you from Sweet thing stamp set in the inside of the heart in Real Red. Cut out. The flower on the heart I used glassy glaze and stickles diamond glitter. The envelope I colored the hearts with Real Red, Bashful Blue and Pretty in Pink with Stampin write markers and added stickles to the red heart. Tape the pieces together as shown and add a bow. Your done with page 5!
Page Six:
 Adhere your 2 3/4" X 3 3/4" Pretty in Pink card stock to your 2 1/2" X 3 3/8"pattern paper piece and tape your 2 1/4" X 3" Real Red on top. Adhere a 1 7/8" X 2 3/4" Photo and stamp Adorable on top of photo in Real Red ink. use the 1/16" punch and punch a hole in the upper right corner and add a brad tag. I stamped Love in Real Red and cut it out from the "so many sayings" stamp set. Adhere to tag brad and you are done with page 6!
The belt dimensions are:
One- 1 & 1/8” X 8 ½” strip of card stock for the Belt layer (Real Red)
One- 1 & 5/8” X 8 ½” strip of card stock for the Belt (Bashful Blue)
2 1/4" X 2 1/2" Bashful Blue card stock
2" X 2 1/4" Real Red card stock
Mon Ami "L" stamp, stamped in Real Red ink on Whisper White.Cut out. Versa mark the entire top of stamped image and add glassy glaze. I did this 3 times. Tape squares together. Use Sticky tape to attach heart to belt and belt pieces together. Staple ribbon pieces to right side of heart and your done!

Saturday, January 19, 2008
Valentine Cards!


Wow! All the things we've learned today! We made a country style card and a spring looking card, both were valentines.

Our New Catalog is Here!
 Click on the link below to see our new Spring & Summer catalog!
http://catalogs.shoplocal.com/stampinup/index.aspx?pagename=shopmain&fsid=f954648f-70e0-4355-9210-06ba08451391&storeid=1038724&circularid=12339