Wednesday, October 31, 2007

We had our Halloween Party!


Wow! What a day! We had met everyone at the gate and brought them to my house. Lilly and her husband were patiently waiting for us to get there. We set up our finger foods outside on three tables and moved the fireplace to the front yard. Everyone changed over into their costumes and started eating. As we were standing outside talking and having our party, trick or treaters were a little confused, they thought we had set up the party for them! They were trying to get a bite of our food! Thank you to the husbands who kept them away!Everyone looked so good in their costumes! The adults wore costumes as well as the kids. We had lots of little witches at our party. Kumie borrowed a witches hat and she was a pink and black witch, Migumi was a pirate like me! Elsa was Cruella Deville, Lilly wore a feathered mask, Eiko was a blonde she devil, Toshiko borrowed a green wig and looked soooo cute, and Kyoko was a cute little witch, too. Kyoko went off with Shelby to go trick or treating with the teenagers in the neighborhood. I am glad they got to spend some time with each other. Tomoko and Toshe were beautiful witches, also! Takumi was the handsomest Shrek and Diana was a very cute baseball player! We had around 40 people combined with Regina's group. The picture only shows some of our group. We headed out for Trick or Treating and came back to have smores in the fireplace. Everyone was having so much fun which made me very happy! Some of the adults had never dressed up before so they were able to experience something NEW, which is always exciting! Happy Halloween memories everyone!


Sunday, October 28, 2007

Halloween Party!


Don't forget our Halloween get together will be on Wednesday at 3:30. We will meet at the contractor's gate. I will be bringing everyone back to my house to have finger foods and take the kids & Moms out "Trick or Treating." We will then come back to my house and have Smore's in the Chimnea! Don't forget to wear your costumes! See you then!

Friday, October 26, 2007

Monday, October 22, 2007

My October Cooking Class-Theme "Autumn Harvest"


I just made my center piece for my cooking class! I think it turned out just gorgeous!!! Elsa and I worked on it today, after shopping for the arrangement pieces. We were able to mix mostly real with some faux plants. Most of the pieces came from out in town. The real plants came from D-Plaza garden shop and the faux from a little shop in downtown Iwakuni. I am using one of my picnic baskets from Longaberger to hold it all.


Our Menu:


Bread
Indian Shuck Bread with Maple Butter
Soup
Pumpkin Curry Soup
Salad
Pear, Grape, and Pecan Salad
Entree
Roasted Wild Mushroom Steaks
Side
Potatoes Anna
Dessert
Apple-Pear Crumble Pies
Beverage
Apple Cider


My gift to them are "Chocolate, Toffee Glazed Almond, Caramel Apples." When I was thinking about my theme and the gift, I had thought about my childhood and my mother had made candied apples for us for Halloween. I remember it very well and it was a special memory for me. I loved them so much! I thought I would share my childhood experience with them, too.
Here is the recipe to make them at home:

"Gourmet Caramel Apples"
6 Granny Smith apples
6 wooden sticks (I used chopsticks and wrapped ribbon around it)
1 (14 ounce) package individually wrapped caramels, unwrapped
2 tablespoons water
1/2 teaspoon vanilla extract
Coating:
Toffee glazed almonds
Drizzle:
1 cup semi-sweet chocolate chips

DIRECTIONS
Insert wooden sticks 3/4 of the way into the stem end of each apple. Place apples on a cookie sheet covered with lightly greased aluminum foil.
Combine caramels and water in a saucepan over low heat. Cook, stirring often, until caramel melts and is smooth. Stir in the vanilla. Dip each apple into the caramel and gently run apples around insides of saucepan to scrape off some of the caramel. Scrape excess caramel from the apple bottoms using the side of the saucepan.

Coating:
Spread the "coating" out on a dinner plate. Roll the apples in the mixture to coat. Place on the aluminum foil and chill.

Drizzle:
Put the chocolate chips in a microwave-safe bowl. Cook in the microwave for 30 second intervals, stirring between each, until melted and smooth. Drizzle over the apples and return them to the refrigerator until ready to serve.


Different types of Apples you can make:
"Halloween Caramel Apples"
Coating:
Orange and black Sprinkles
Drizzle:
1 cup of semi-sweet chocolate chips
"Peanut Butter Crunch Caramel Apples"
Coating:
3 cups chopped peanut butter filled sandwich cookies
Drizzle:
4 ounces milk chocolate, chopped
4 ounces white chocolate, chopped
"Smore's Caramel Candy Apples"
Coating:
1 1/2 cups miniature marshmallows
1 1/2 cups crushed graham crackers
1 cup miniature peanut butter cups
Drizzle:
1 cup semi-sweet chocolate chips
"Seattle Caramel Apples"
Coating:
3 cups trail mix
Drizzle:
1 cup semisweet chocolate chips
"Rocky Road"
Coating:
1 1/2 cups miniature marshmallows
1 1/2 cups chopped pecans, toasted
Drizzle:
1 cup semisweet chocolate chips
Get creative and make up your own!
Use Gummies,Pistachios, M&M's, Etc... :o)

Friday, October 19, 2007

Second Smack'n Acetate Class

We had our second Smack'n Acetate class today. As you can see everyone was hard at work putting together their cards. Lily and Elsa were in the kitchen, but that's ok, because they were getting pretty creative in there on their own! Great job you two! We had done another Halloween card and a fall card with the new technique. It is so easy, but gives you such a dramatic effect. I just love the look of it. Lily, I hope you can use what you learned today in your Scrap booking. I think it could make some really amazing pages for you. See you all at the next class! The directions for the technique are below in another post.

Tuesday, October 16, 2007

"In Everything Give Thanks" Card


Next Cooking Class-Theme "Autumn Harvest"

Our next Cooking Class will be on the 26th of October. My theme is "Autumn Harvest!" See you then!

Next Class-Second "Smack'n Acetate technique!"

Our next class, Eiko-san's, is on Friday the 19th. This is the second class we will be doing on the "Smack'n Acetate technique." See you then! As of now we have 8 people.

October Card Class-Theme "Antique Christmas"


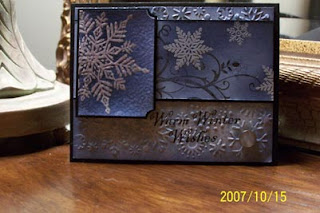
Our class today was on making Christmas cards, "Antique Christmas cards". Two different styles, Two of each style. The first card we did was an antique Victorian looking card using the Peaceful Wishes stamp set and the second was a snowflake card. I love snow! So, I had to break out my Snowflakes stamp set for the second card. The picture is above. We used a sponge and sponged the edges of our blue snowflake Designer series paper from last year. Stamped our word stamp in black and then Cuttlebugged it with a Cuttlebug snowflake embossing folder . I then had them attach the bead to the paper. I found the beads at our craft store on base. I think they are for applying to clothing like the "Beadazzle" beads. I look at everything differently now:o) We stamped our Baroque Motifs stamp on our paper strip with basic black. Versamarked our strip with two of the Snowflake stamps and then embossed it with Winter White embossing powder. We used a sponge and applied Night of Navy ink in a circular motion starting in the middle of the snowflakes and worked our way out. I used the smallest snowflake and Versamarked it on the empty spots of our strip. The big snowflake was Versamarked and embossed with Winter White embossing powder then sponged with Night of Navy in the technique used for the snowflakes on the strip. Then we Versamarked the whole snowflake paper and covered it with glassy glaze and used our heat gun to finish. They even took it a step further and embossed white little snowflakes on bashful blue paper and then punched them out. They sandwiched silver cording between two snowflakes and pop-dotted them together and made tassels dropping from the top of their cards. I don't have a picture of that yet but I will post it soon. Everyone's cards turned out great! So proud of you all! Doesn't Kayoko-san look sooo cute in that picture!!! Her cards match her outfit, too!


Sunday, October 14, 2007

Next Class-Christmas Cards!

Our next class is on October 16th. We will be making Antique Christmas cards. See you Then! As of now 6 people will be attending.

Thursday, October 11, 2007

Shopping at "Yanagiya Decor"


Shopping at "Yanagiya Decor"
I had seen this beautiful gift shop in downtown Iwakuni as I was shopping with my husband. I went in and found some very beautiful faux leaves and pumpkins to decorate our home for fall. The women there are so friendly and helpful, always smiling! I was so pleased by their products and service I had to go back and bring one of my friends to see it. Elsa and I went to the gift shop yesterday and I showed her what all they had there. She loved it so much she bought a bunch of things, also. When we were checking out, the Japanese ladies asked if we would take pictures of what we bought when we put it together. I gave her my card and hope she can see this post. We will surely be coming back again and again! Domo Arigato Yanagiya Decor!

Tuesday, October 9, 2007

October ABC Class-Halloween Box And Candle


We made our boxes and candles today! I was so excited to teach the candle technique. It really is amazing. The results are beautiful! Everyone did a wonderful job! I just hope they will try to make some of those darling candles at home. You can do it! You proved it today. The directions to the 2,4,6,8 box and the candles are below.


2,4,6,8 Boxes


1. Cut a sheet of cardstock in half that is 8 1/2" X 11" inches. It will now measure 8 1/2" x 5 1/2" inches.

2. Stamp sheet as desired.

3. Score the paper at 2", 4", 6" and 8" along the 8 1/2" length side of cardstock piece. You will have a 1/2" section left over.

4. Turn cardstock piece 90 degrees, and score entire length of cardstock at the 2" mark. (Your scoring blade will travel 8-1/2" down. The 5 1/2" side of cardstock piece will be against the bottom lip of your paper cutter).

5. Look at your scored cardstock piece. Take scissors and trim off the 2" x 1/2" section (not the 3 1/2" x 1/2" section). *Note: The 3 1/2" x 2" sections are the box top and the 2" x 2" sections are the box bottom.

6. Cut each 2" score mark along the 8 1/2" side. (You will be making three straight cuts, each along the 2" score marks). Do not cut beyond the long score mark running the length of the 8 1/2" side.

7. Fold along all score marks.

8. Place a section of sticky strip tape along the 3 1/2" x 1/2" flap on the decorated/stamped side. Seal the top part of the box closed.

9. Fold up the four 2" x 2" pieces; this is the bottom of your box. Use a sticky strip on the last 2" x 2" piece to seal the bottom of the box. Now decorate and fill your box!


Stamped Candles


Supplies:


Candle - preferably white or cream
vellum paper
Stamps
Stazon Pad
reinkers
Aqua painter pen
Scissors
Wax Paper
Embossing Gun


Step 1. Stamp on vellum paper. Use images that can be colored-in, in the ink color of your choice.
Step 2. Color in stamped images using reinkers and Aqua painter pens. you will want to make sure your Aqua painter is not very wet but has a fair amount of reinker on it.


Step 3. Cut out your stamped images fairly close to the edges.

Step 4. Take a piece of wax paper and cut it so that it is not any taller than the candle being used and long enough so that it wraps completely around the candle and then some.

Step 5. Take your first stamped image and place it on the candle. Then place the wax paper on top and wrap the wax paper around the candle. Tape, making sure the wax paper is tight against the candle.

Step 6. Heat up your embossing gun for 30-40 seconds until it is nice and hot. Moving quickly, wave it over the area where the stamped image is; be sure to keep the wax paper nice and tight. Every candle will have a different wax melting point, but you should see a change begin to take place within a few seconds. As the candle heats up, the pressure from the wax paper should push the image into the melting wax of the candle, embedding the image and leaving your image intact.
Slowly peel the wax paper off the candle. Remember: every brand is different so if you are switching between brands you may need to adjust your heating times a bit.

Step 7. Finish your candle.
You can do numerous images on one candle; just place another image and move the wax paper. It is best to try and not use the same spot on the wax paper for each image, but you can use 1 piece of wax paper numerous times.

Your Turn!

Sunday, October 7, 2007

Next Class-ABC!

Our next class is October 10th. It is our Anything But a Card class. We will be working on more Halloween projects! See you then!

World Card Making Weekend


We celebrated World Card Making Day this weekend by making our Christmas cards early and making bag toppers for the nursing home gift bags. Our ladies were able to make 15 cards each of the design above. Their cards turned out beautifully and some got very creative and changed the Santa in the ball by using other stamps. Toshiko picked a Santa from Holiday Tag Team stamp set and made it look like he was dancing! She had put musical notes around him. So cute and cleaver! Great job Toshiko! Her daughter, Kyoko, was very helpful and put together some of her mother's cards with her.
Kiriko knew a woman named Nicky, a British woman who is from Hiroshima, that does scrap booking. It was very nice to meet her and talk to her about scrap booking and card making. She can speak Japanese very well and write in Kanji! She is amazing! If anyone is interested in scrap booking let me know I can get you in touch with her. She teaches in Hiroshima.
Sunday I got to spend time stamping with Elsa, Kumie and Migumi, sorry Migumi if I misspelled your name. We spent the day stamping toppers to go on gift bags for our local nursing homes. We will fill them later as it gets closer to Christmas. Last year we had bags filled with socks, pens, pads of paper, lip balm and other items. Kanetha we will miss you this Christmas! The people from the nursing home enjoyed us just being there, holding their hands, sharing kind words, I love them and that experience!
Migumi your cake was amazing! Thank you!

Friday, October 5, 2007

World Card Making Day!

See you tomorrow! We will be in building 955 near the back gate.

Elsa's Cooking Class-Theme "Pears"


The Menu

Salad
Blue Cheese Salad

Bread
Blue Cheese and Pear muffins

Entree
Duck with Carmelized Pears

Dessert
Pear Pastries

Beverage
Pear-Ginger Drink


Wednesday, October 3, 2007

Serene Sakura


I had a polished stone paper background I had made recently and noticed it matched the basic grey papers. They looked Asian to me so I pulled out my torii stamp I had made by Rubberstamps.net. You can upload a picture to their site and they can make a stamp from it. Amazing! I had a beautiful picture of a torii that I had taken while visiting Miyajima island here in Japan. My picture is above. I uploaded my picture to them, picked my size stamp I wanted and they made it for me! I wanted to use it and finally got the chance.


We had our class today! The ladies were so excited about making a Halloween card. They love Halloween decorations and the whole Halloween holiday.We used the Smack'n Acetate technique. Their cards turned out beautifully! We had a little trouble at first with the acetate I was using. It was a projector sheet which has a thin layer of glue on one side. So, you had to be very careful what side you put down on the ink and water mixture. We had made that mistake twice and it stuck pretty bad and tore the paper. Once we figured out what was happening they were on their way and doing great. Their backgrounds were terrific! After finishing our background paper we embossed the tree and the witch in black embossing powder. It gave the card depth. It looks as if the tree and the witch are way off in the background. We used three of Stampin' Up's new Halloween stamp sets, Home is here the Haunt is, Autumn apparitions and my favorite, Autumn Harvest. I used a "Just between friends" saying in the inside of our cards which said "It's time for a Brewhaha." It looked great stamped in white ink against the black card. Bitty Boos Too was also used for the tag. For the fall card we used my favorite fall set "Country Blessings."The leaf on the fall card was completely embossed with iridescent ice. The cards were pretty easy for them to do, just a lot of layering work.

This is my favorite time of year with the beautiful colors of fall. Oranges, yellows, browns and greens. My favorite paper pack "Earth Elements":o) Makes me want to create something!

Monday, October 1, 2007

Baroque'N Tile Card


Just finished this card using the Smash'n Ink technique. It is like the Smack'n Acetate without the spray bottle. I just used my reinkers that matched my paper colors and sandwiched it between two sheets of glossy white paper. The effect is beautiful. I love my Baroque Motifs stamp set so much and I use it as often as I have the chance. It just worked real well with this card. I was at the Japanese "Home Depot" NAFCO in Iwakuni and saw these beautiful furniture tacks. They make great embellishments for cards. I just cut off the pointy end of the tack and pop-dot it on. I was getting anxious for fall and wanted to break out my leaf print and tree stamps. I miss them, they are my favorite style stamps. The colors I used for this card were Always Artichoke, So Saffron, Ruby Red and Basic Black.